This is a follow up writeup to:
Evasive Loader Payload Extraction
In the previous writeup the loader and its evasion techniques were analysed and the second-stage payload was extracted.
It is this second stage payload that is the subject of this writeup.
We will understand the Maru API hashing algorithm (link) that is used to dynamically resolve the imports at runtime.
After that we will decrypt an embedded config and from it extract an executable.
The decryption algorithm for the configuration is chaskey (link). The executable is reflectively loaded into memory and executed.
In addition, we identify evasion tactics because the shellcode patches security-related API functions in-memory to disable them.
Notice that this had already been done by the loader, indicating the strong emphasis this sample puts on stealth.
In a follow up part 3 writeup, the analysis of the extracted third-stage executable will be performed.
Triage
Let us start by writing down the hashes of the extracted second-stage payload we call payload.bin:
| Type | Hash |
|---|---|
| MD5 | 5ace55c20cba9fa4722695462ff7f8b7 |
| SHA1 | 32354fc8a65b965dc7d5dfd6c9ba1a81bde2dcbf |
| SHA256 | 75da9dfe4d0ef6db1d68533ef66a70d4c26230fc82e50e6428f4931800f7b3b2 |
No cleartext strings can be found in the payload:
$ strings -n 8 payload.bin
&~Pl?#WYh
Hl(EBH70
SFt=~6ww
0Sd~g{vZ
RZc#7(|K
-61MG4u9
$EL%RDzeDW
K);Pa^dy
KX'D    8QR
7G  #Hq+b
$-5R0u;t
wK6lohV?
M4iPjBp<
|c0dw?,u
MNBx (m?
w:b*@%OdL
hcLxRWn.
0X~V~bF=
x:lk.!U{
_J%smx*a
7/-Hq*y-Ee
piqoulN_
:k}->nDUW
qu;B3Bk_
Z9Ap)"D
9z5d59p\z'
>4wmHyZ4
The file has high entropy, indicating that it contains packed or encrypted components:
$ cat payload.bin | ent
Entropy = 7.829456 bits per byte.
Static Analysis
For further in-depth static analysis, we open the file in Ghidra as x86-64 shellcode.
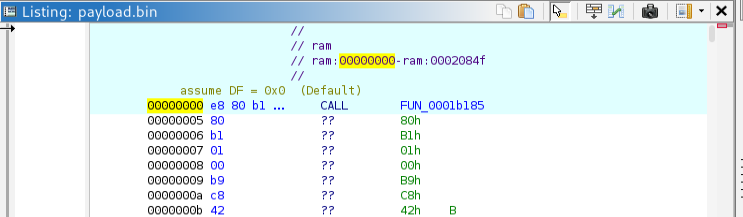
The first instruction is a function call to a function named FUN_0001b185.
For later usage, we will note that the address of the following instruction, i.e. the return address that is being pushed to the stack is 0x5:
Looking at the body of the function we can see that the first instruction is POP RCX.
It pops the return address (0x5) into RCX from where it is then stored in the variable local_res10:

This fetches the address of the instruction immediately following the initial function call in the shellcode.
While in Ghidra, this is at address 0x5, notice that when the loader executes the shellcode it is located at offset 0x5 into the buffer allocated for the payload.
The code then checks the value of the QWORD located at offset 0x238 from local_res10 (i.e. 0x23d).
If the value is 0, it jumps to address LAB_0001b388.
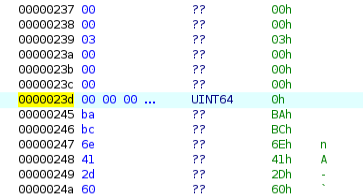
Looking at the value at address 0x23d and converting it to a QWORD (UINT64), we can see that it is zero, i.e. the jump is taken:
Displaying the address in Ghidra, one can see that the function FUN_0001b3a4 with the argument of the extracted return address is called:

For ease of use, we will rename:
FUN_0001b185:mw_fn_stage2_mainFUN_0001b3a4:mw_fn_stage2_path_taken
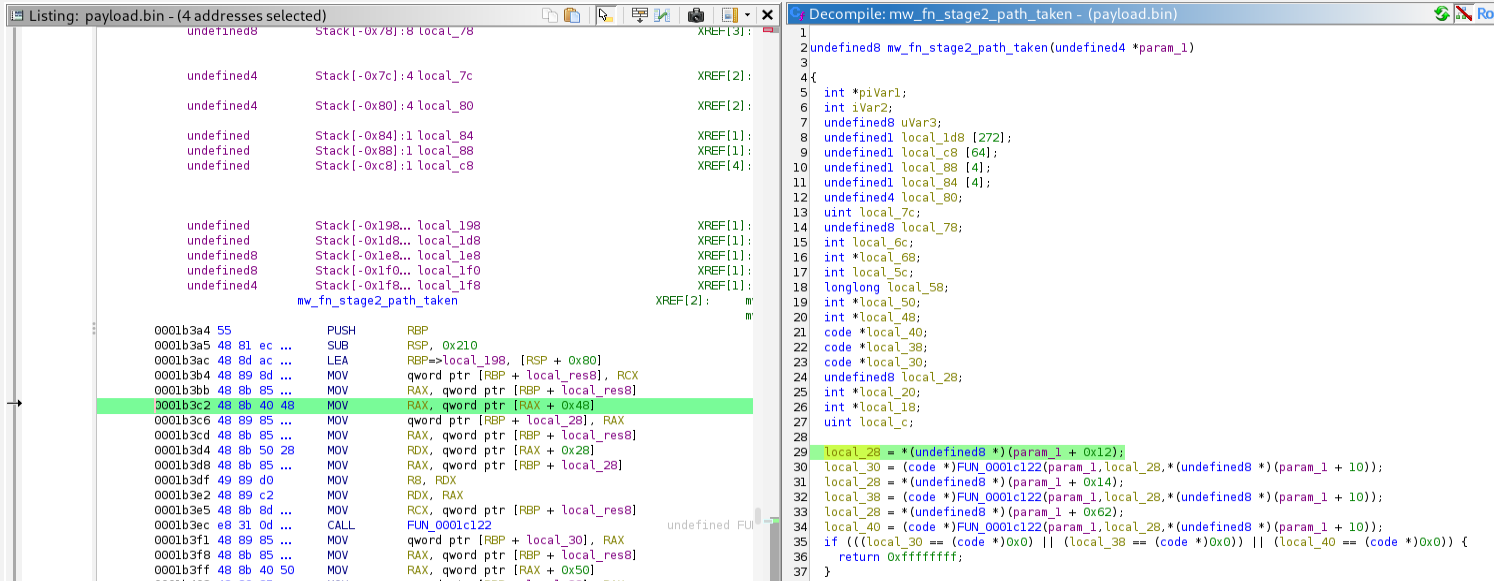
If we look at the body of mw_fn_stage2_path_taken, we can see three subsequent calls to the function FUN_0001c122.
In all functions, the first and third argument are the same, while the second argument changes.
The second and third arguments are read from offsets of the stored return address (0x5) that was popped from the stack.
We can thus assume that this is some sort of data buffer that is used by the shellcode as position independent code (PIC):
Subsequent calls in the shellcode to the same function with different arguments usually hint at dynamic resolution of dependencies.
For this reason we will rename the function FUN_0001c122 to mw_fn_resolve_api and derive the API hashing algorithm in the following.
API Hashing
By looking at the decompiled code of mw_fn_resolve_api, we do see that it loops over the loaded DLLs, consistent with resolution of API hashes:
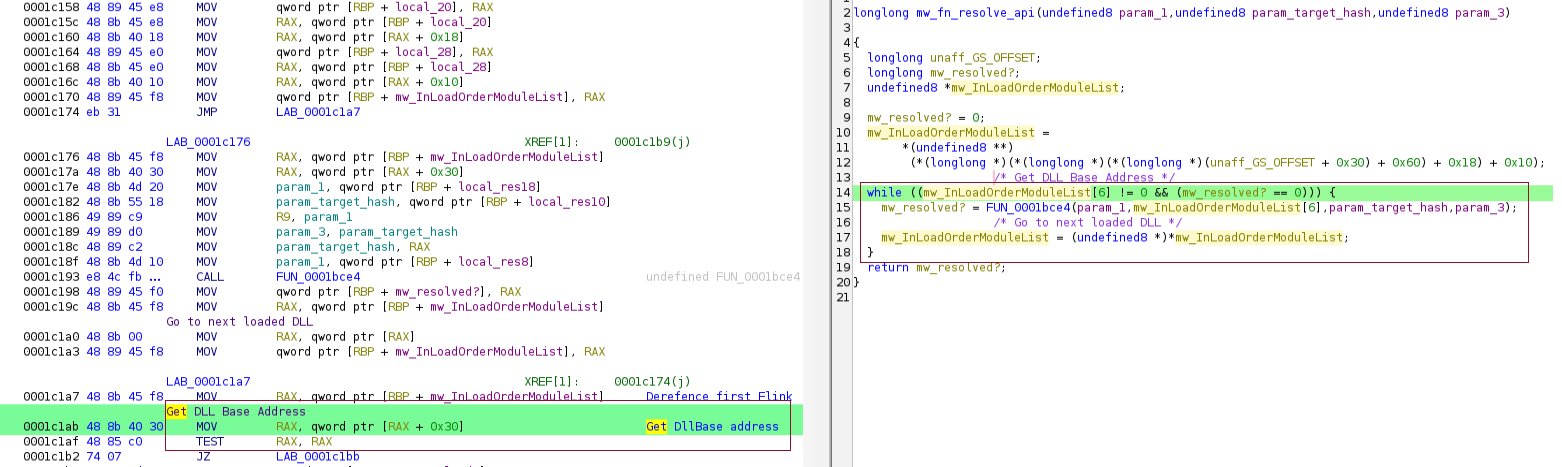
First, it fetches the address of the InLoadOrderModuleList from the PEB::Ldr structure.
For each element in the linked list, it extracts the base address of the DLL and passes it to the function FUN_0001bce4 together with (what we assume) is the target API hash and param_1 and param_3.
Notice that param_1 contains the offset 0x5 that is being used as a reference to the code / data stored after the call to mw_fn_stage2_main at the beginning of the shellcode.
The second parameter is the base address of DLL and the third parameter is assumed to be the API hash used for resolution because it changes on every call to mw_fn_resolve_api.
The fourth parameter (or third parameter to mw_fn_resolve_api) is a constant across calls to mw_fn_resolve_api.
One could be tempted to assume it is the hash associated to a library and that only APIs from a single library are being resolved.
At the current point, we can exclude this assumption, as the code in mw_fn_resolve_api loops over all loaded DLLs but uses the same value from param_3 for each different DLL.
We will rename param_3 to param_seed for reasons that will become clearer later.
At the current point we assume that the function FUN_0001bce4 resolves a function based on its hash from the passed DLL.
We therefore rename it to mw_fn_resolve_api_from_module.
The loop continues for as long as mw_resolved? is zero. Once it contains the address of the resolved function, the function returns it.
Let us now have a look at the function mw_fn_resolve_api_from_module:
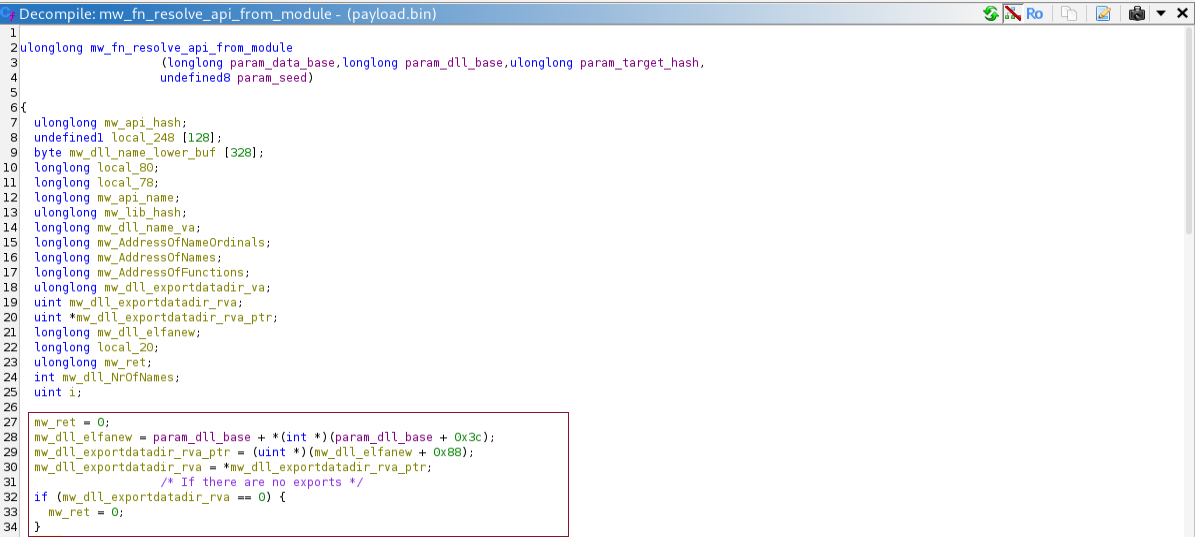
As expected from a function that resolves the hashes of exported functions, it starts by retrieving information about the export directory from the module.
It retrieves the virtual address (VA) of the DLL name and loops over each character in the name:
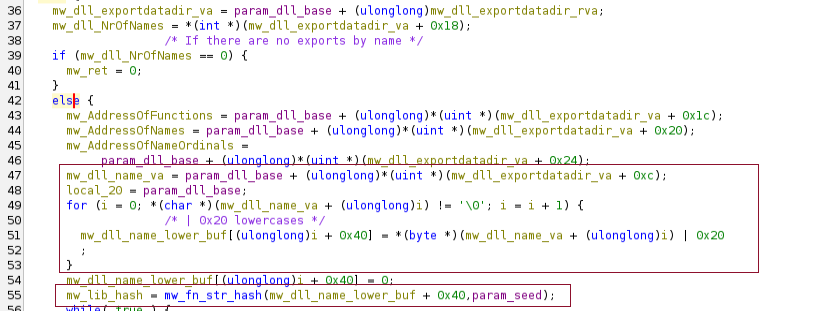
The line:
mw_dll_name_lower_buf[(ulonglong)i + 0x40] = *(byte *)(mw_dll_name_va + (ulonglong)i) | 0x20
lowercases each character through | 0x20 and stores it in the buffer mw_dll_name_lower_buf.
After that, the lower case DLL name is passed to the function mw_fn_str_hash together with the seed value.
It will turn out that this computes the hash of the module name.
Then, a while loop loops over all of the exported APIs in the module:
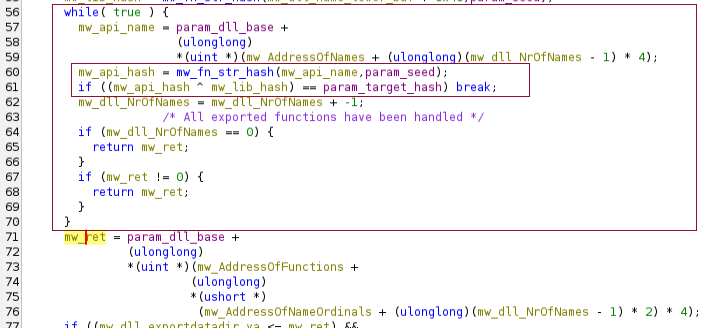
The critical information can be gained from the following two lines:
mw_api_hash = mw_fn_str_hash(mw_api_name,param_seed);
if ((mw_api_hash ^ mw_lib_hash) == param_target_hash) break;
The hash of the API function is computed through a call to the same function as for the module name, mw_fn_str_hash (albeit without lower casing).
If the XOR'ed values of the module and API hashes match the provided target hash, the resolution succeeded, the loop breaks and the address of the resolved function is computed.
We can thus start the implementation the API hashing algorithm:
def mw_fn_str_hash(name: str, seed: int) -> int:
    """TODO: find out exactly how the hashing works."""
    return 0


def api_hash(dll_name: str, api_name: str, seed: int) -> int:
    return mw_fn_str_hash(api_name, seed) ^ mw_fn_str_hash(dll_name.lower(), seed)
String Hashing
The following screenshot shows the decompiled body of the function mw_fn_str_hash:
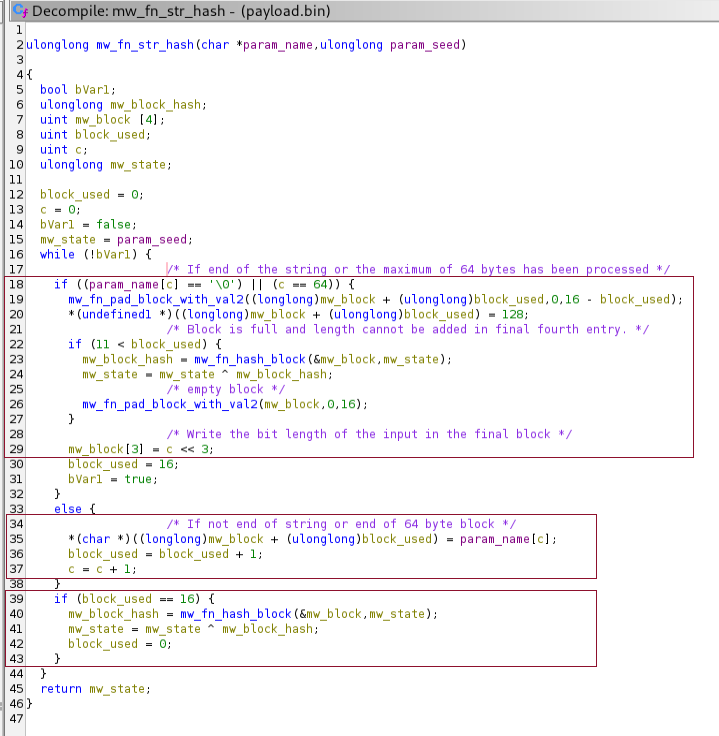
It hashes up to 64 bytes of the passed-in data.
The data is hashed in up to 4 blocks of 16 bytes.
The flow is the following.
- Construct a block of 16 bytes (lines
34-37) - Pass the block to the block-hash function
mw_fn_hash_blockand update the hash according tomw_state ^= block_hash(lines39-42)
The most complicated part of the function is dealing with the last block (lines 18 - 29):
When one arrives at the last character of the name and the block is not yet full, the next byte of the block receives the value 0x80 (128) and the remainder of the block is padded with zeros.
The last four bytes, or the last DWORD integer in the block receives the bit-length of the processed data (the value of c corresponds to the number of processed bytes):
mw_block[3] = c << 3;
The left-shift three corresponds to a multiplication by 8 to take into account that each one of the processed bytes consists of 8 bits.
One complication can arise if the last block does not have space for the DWORD specifying the length of the processed data.
In this case the padded block will be hashed first and used to update the state.
After that, an empty block will be created and the length will be inserted into that block (lines 22 - 26).
We can thus continue the conversion of the algorithm to Python:
MASK64 = 0xFFFFFFFFFFFFFFFF


def mw_fn_hash_block(block: bytes, state: int) -> int:
    """TODO: implement the block hashing algorithm"""
    return 0


def mw_fn_str_hash(data: bytes, seed: int) -> int:
    state = seed & MASK64
    c = 0
    used = 0
    block = bytearray(16)

    while True:
        if c >= len(data) or c == 0x40:
            # the block is already 0-padded by construction, only set the 0x80 byte
            block[used] = 0x80

            if used > 0xB:
                state ^= mw_fn_hash_block(bytes(block), state)
                block[:] = b"\x00" * 16

            block[12:] = (c * 8).to_bytes(4, 'little')
            state ^= mw_fn_hash_block(bytes(block), state)
            return state & MASK64

        block[used] = data[c]
        used += 1
        c += 1

        if used == 16:
            state ^= mw_fn_hash_block(bytes(block), state)
            used = 0
            block[:] = b"\x00" * 16


def api_hash(dll_name: str, api_name: str, seed: int) -> int:
    return mw_fn_str_hash(api_name, seed) ^ mw_fn_str_hash(dll_name.lower(), seed)
The remaining thing to understand in the context of API hashing is the functionality of mw_fn_hash_block.
Block Hashing
The decompiled body of the function mw_fn_hash_block looks as follows:
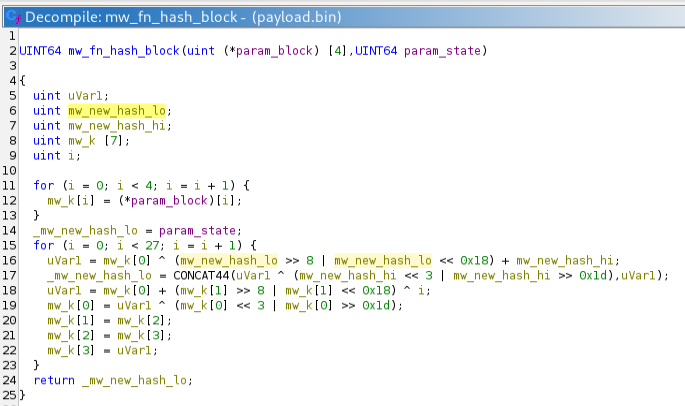
The uint64_t state variable's high and low uint32_t components are treated differently.
To simplify porting the algorithm to Python, it is beneficial to look at the code in BinaryNinja where I feel it is easier to see what happens and to port it:
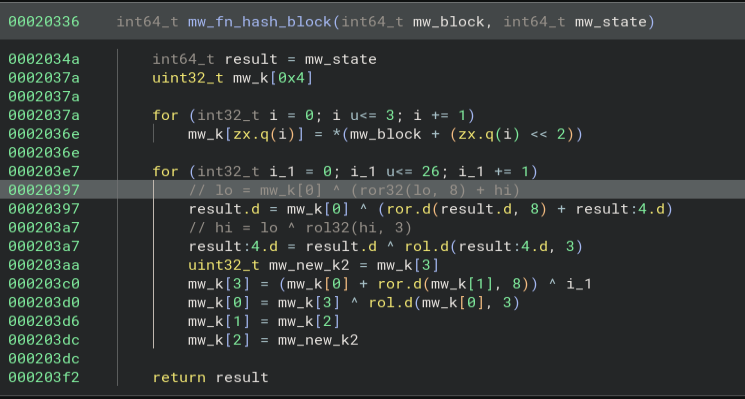
Translated to Python, the block hashing looks as follows:
MASK32 = 0xFFFFFFFF
MASK64 = 0xFFFFFFFFFFFFFFFF


def rol32(x: int, r: int) -> int:
    return ((x << r) | (x >> (32 - r))) & MASK32


def ror32(x: int, r: int) -> int:
    return ((x >> r) | (x << (32 - r))) & MASK32


def mw_fn_hash_block(block: bytes, state: int) -> int:
    k = [int.from_bytes(block[i*4: i*4+4], 'little') for i in range(4)]

    lo = state & MASK32
    hi = (state >> 32) & MASK32

    mw_new_hash = state
    for i in range(27):
        lo = (k[0] ^ ((ror32(lo, 8) + hi) & MASK32)) & MASK32
        hi = (lo ^ rol32(hi, 3)) & MASK32

        uVar1 = (k[0] + ror32(k[1], 8) ^ i) & MASK32
        k[0] = uVar1 ^ rol32(k[0], 3)  & MASK32
        k[1] = k[2]
        k[2] = k[3]
        k[3] = uVar1

    return ((hi << 32) | lo) & MASK64


def mw_fn_str_hash(data: bytes, seed: int) -> int:
    state = seed & MASK64
    c = 0
    used = 0
    block = bytearray(16)

    while True:
        if c >= len(data) or c == 0x40:
            # the block is already 0-padded by construction, only set the 0x80 byte
            block[used] = 0x80

            if used > 0xB:
                state ^= mw_fn_hash_block(bytes(block), state)
                block[:] = b"\x00" * 16

            block[12:] = (c * 8).to_bytes(4, 'little')
            state ^= mw_fn_hash_block(bytes(block), state)
            return state & MASK64

        block[used] = data[c]
        used += 1
        c += 1

        if used == 16:
            state ^= mw_fn_hash_block(bytes(block), state)
            used = 0
            block[:] = b"\x00" * 16


def hash_api(dll_name: str, api_name: str, seed: int) -> int:
    return mw_fn_str_hash(api_name.encode('ascii'), seed) ^ mw_fn_str_hash(dll_name.lower().encode('ascii'), seed)
Searching for a similar algorithm online, we can find a Github repository about the Maru (Ma-roo) hash function (link).
Looking at the code, this is exactly what we have just reverse engineered (link).
Hash Resolution
Now that we have understood that the API hashing is based on the Maru hash function, we can resolve the hashes.
We move back to the function mw_fn_stage2_path_taken where mw_fn_resolve_api_hash is called three times in a row:

We can see that the API hash is located 0x48 bytes into the data storage buffer and the seed at offset 0x28 into the buffer.
Visiting these offsets:
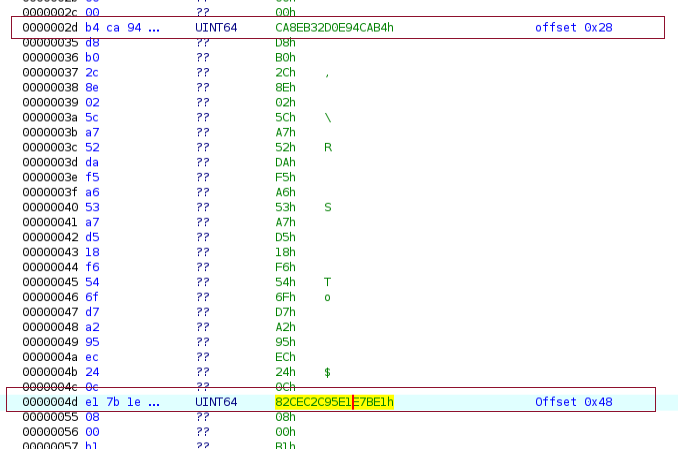
we can determine the values for the API hash and seed:
- seed:
0xCA8EB32D0E94CAB4 - api hash:
0x82CEC2C95E1E7BE1
We can use our Python implementation of the hashing algorithm to verify that this API hash corresponds to VirtualAlloc:
if __name__ == '__main__':

    # api_hash =  0x82CEC2C95E1E7BE1
    seed     =  0xCA8EB32D0E94CAB4

    print(f"Computed: {hex(hash_api('kernel32.dll', 'VirtualAlloc', seed))}")
This gives the output:
Computed: 0x82cec2c95e1e7be1
Repeating this for the following two functions, we can see that VirtualAlloc, VirtualFree and RtlInitUnicodeString are resolved:
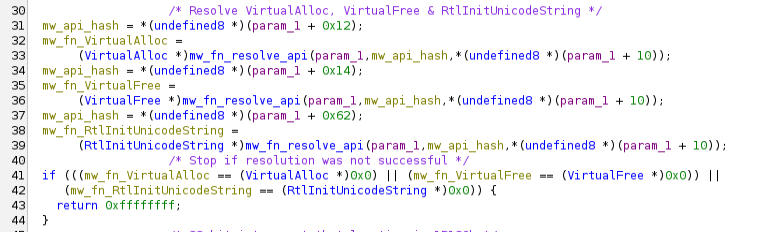
Then, a 32-bit size value (0x1B180) is read from the beginning of the buffer.
This is used to allocate a buffer using VirtualAlloc:
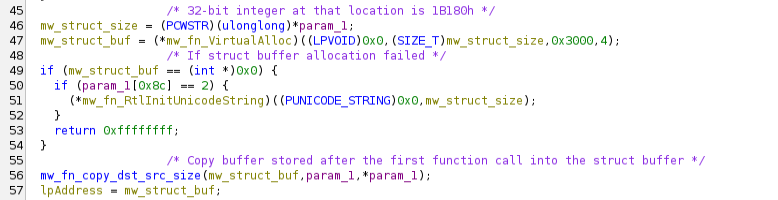
In line 56 the function call mw_fn_cpy_dst_src_size copies a number of bytes equivalent to the size of the allocated buffer starting at address param_1 (i.e. 0x5) to the newly allocated buffer.
We consider this to be a struct and create a corresponding structure with the appropriate size:
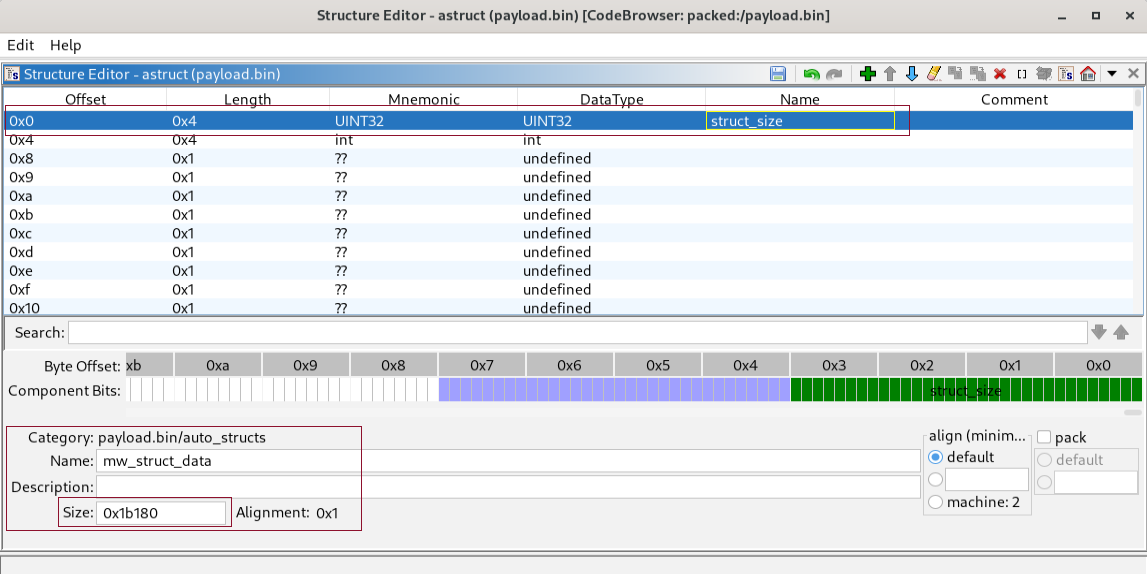
We also renamed the first field to struct_size as we know its meaning.
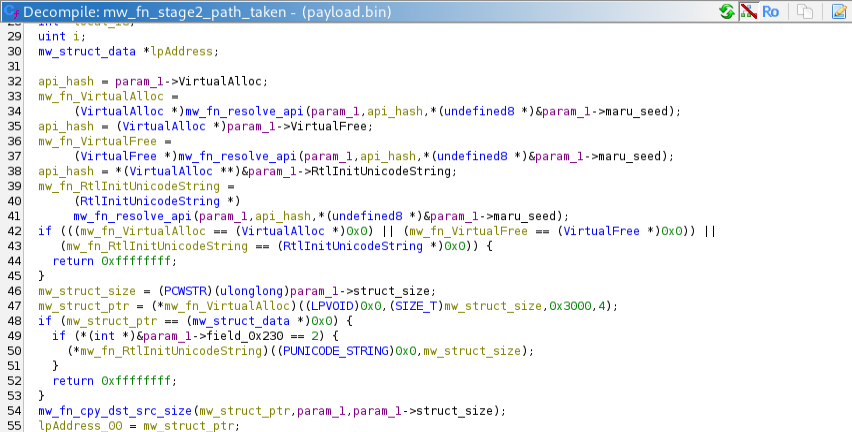
With the definition of the struct, the code in mw_fn_stage2_path_taken looks a lot clearer:
The following screenshots shows the next actions taken by the code:
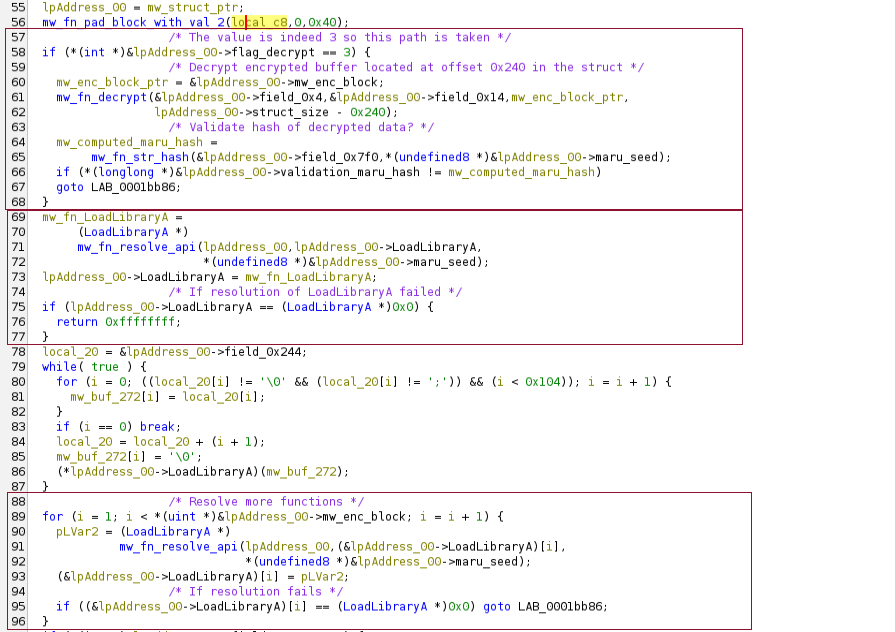
The first box (containing lines 57 to 68) deals with the decryption of a buffer located at offset 0x240 in the struct.
The decryption of that block and the extraction of the associated third-stage payload will be discussed below.
For now, we will skip this part and focus on the last two boxes dealing with the dynamic resolution of API functions.
The second red box shows the dynamic resolution of the LoadLibraryA API function.
It loads the API hash from the struct and replaces the corresponding data with the address of the resolved API function.
The final red box shows a loop that runs over all 64-bit entries following the position of the LoadLibraryA entry in the struct.
For each entry, the corresponding 64-bit API hash is read, resolved and the hash value is replaced with the address of the resolved function.
We can look up the API hashes in the struct and resolve them using our Python implementation of the Maru hashing algorithm.
The following functions can be resolved:
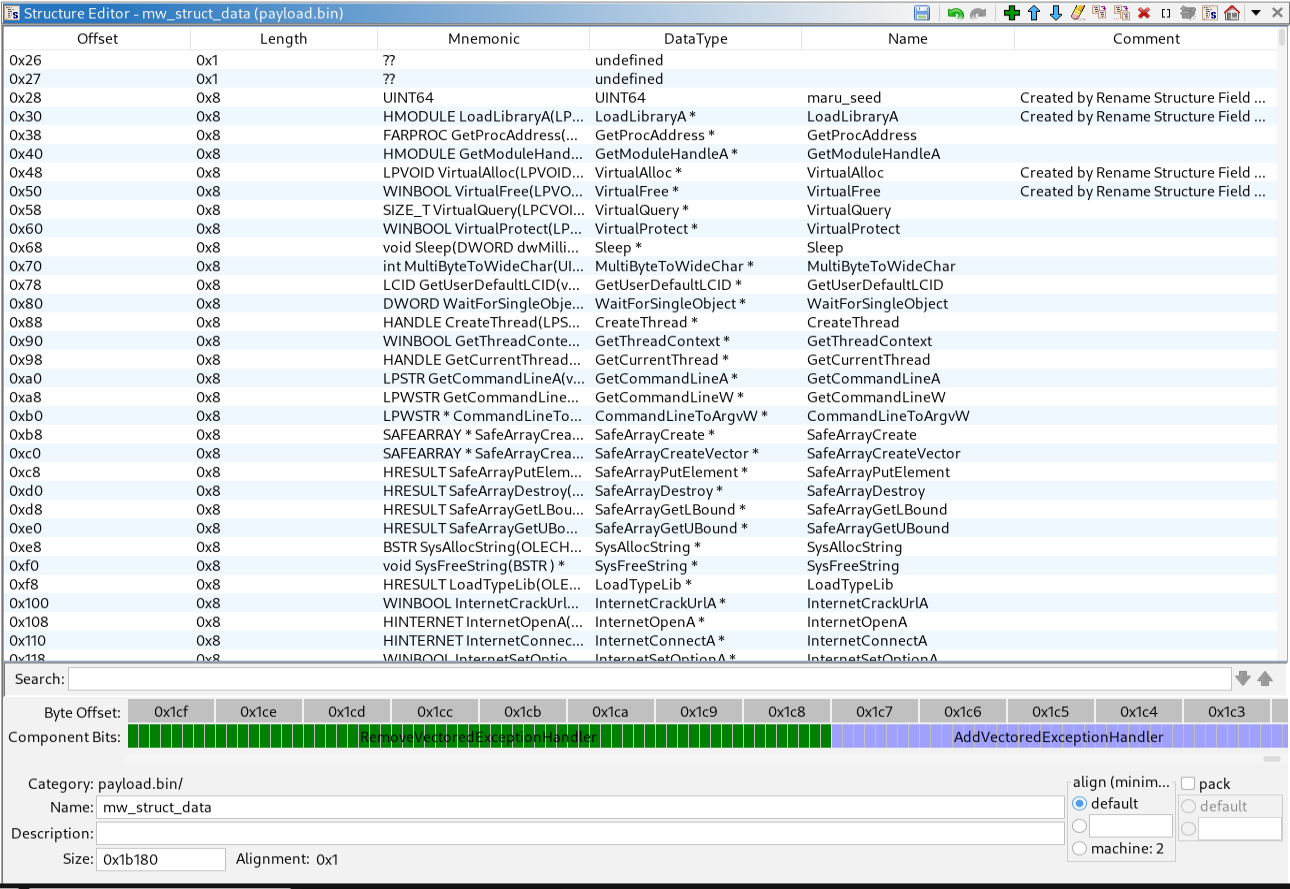
kernel32::LoadLibraryAkernel32::GetProcAddresskernel32::GetModuleHandleAkernel32::VirtualAllockernel32::VirtualFreekernel32::VirtualQuerykernel32::VirtualProtectkernel32::Sleepkernel32::MultiByteToWideCharkernel32::GetUserDefaultLCIDkernel32::WaitForSingleObjectkernel32::CreateThreadkernel32::GetThreadContextkernel32::GetCurrentThreadkernel32::GetCommandLineAkernel32::GetCommandLineWshell32::CommandLineToArgvWoleaut32::SafeArrayCreateoleaut32::SafeArrayCreateVectoroleaut32::SafeArrayPutElementoleaut32::SafeArrayDestroyoleaut32::SafeArrayGetLBoundoleaut32::SafeArrayGetUBoundoleaut32::SysAllocStringoleaut32::SysFreeStringoleaut32::LoadTypeLibwininet::InternetCrackUrlAwininet::InternetOpenAwininet::InternetConnectAwininet::InternetSetOptionAwininet::InternetReadFilewininet::InternetCloseHandlewininet::HttpOpenRequestAwininet::HttpSendRequestAwininet::HttpQueryInfoAole32::CoInitializeExole32::CoCreateInstanceole32::CoUninitializentdll::RtlEqualUnicodeStringntdll::RtlEqualStringntdll::RtlUnicodeStringToAnsiStringntdll::RtlInitUnicodeStringntdll::RtlExitUserThreadntdll::RtlExitUserProcessntdll::RtlCreateUnicodeStringntdll::RtlGetCompressionWorkSpaceSizentdll::RtlDecompressBufferntdll::NtContinuekernel32::AddVectoredExceptionHandlerkernel32::RemoveVectoredExceptionHandler
At this point, the structure contains already some information:
Stage 3 Decryption
During the analysis of the function mw_fn_stage2_path_taken we mentioned the call to a decryption routine that was renamed to mw_fn_decrypt:
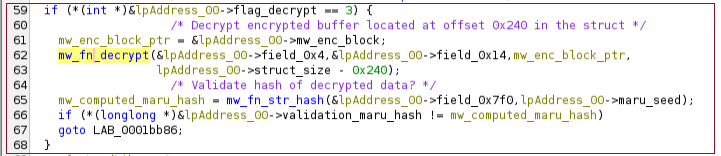
In the following, this function will be analysed.
Its decompiled body is shown in the following screenshot:
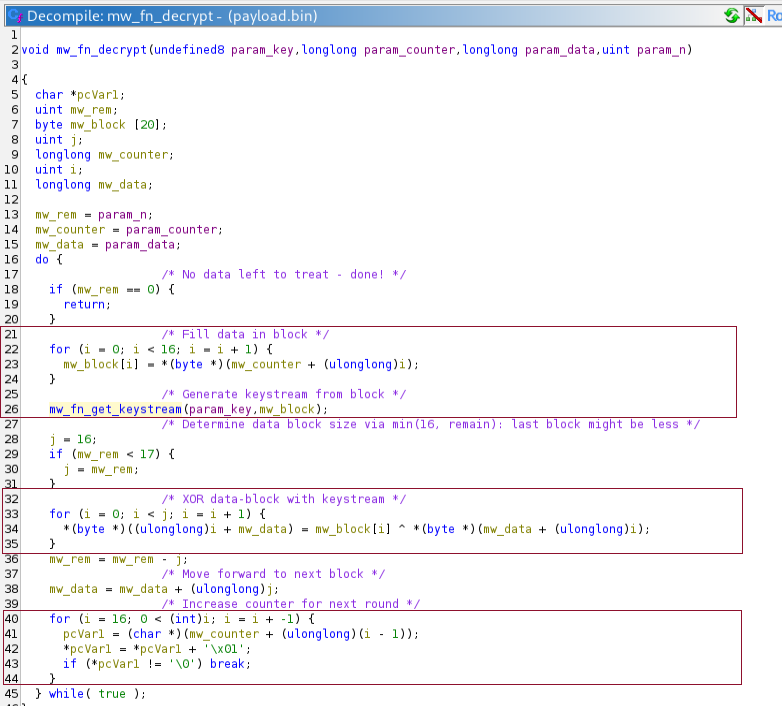
This function treats the data to be decrypted in 16-bytes blocks:
- Construct a 16-byte block from the
countervariable to derive a 16-byte key stream using thekeyand a call tomw_fn_get_keystream. - XOR the keystream with the bytes from the data
- Increase the counter for the next round.
We can thus start to replicate the code in Python:
def mw_fn_get_keystream(key: bytes, block: bytes) -> bytes:
    pass

def mw_fn_decrypt(key: bytes, counter: bytearray, data: bytearray) -> bytes:
    for offset in range(0, len(data), 16):
        stream = mw_fn_get_keystream(key, counter)
        for j in range(0, min(16, len(data) - offset)):
            data[offset+j] ^= stream[j]
        for i in range(15, -1, -1):
            counter[i] = (counter[i] + 1) & 0xFF
            if counter[i] != 0:
                break
In the next step, we try to understand the function mw_fn_get_keystream.
Its decompiled body looks as follows:
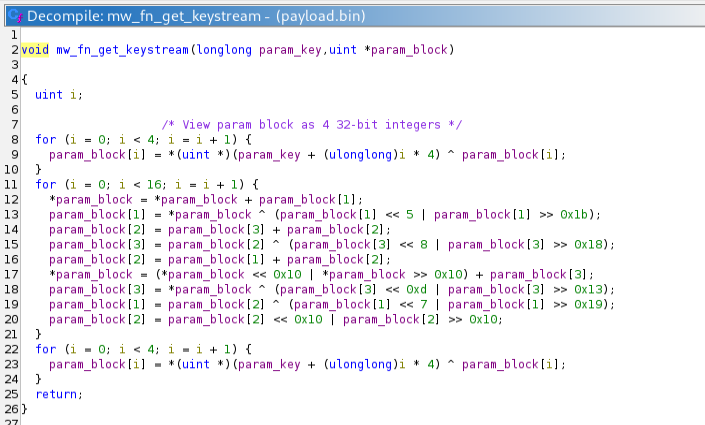
Imitating this in python, we can extend our decryption logic:
import struct


MASK32 = 0xffffffff


def rol32(x: int, n: int) -> int:
    return ((x << n) | (x >> (32 - n))) & MASK32


def mw_fn_get_keystream(key: bytes, block: bytes) -> bytes:
    k0, k1, k2, k3 = struct.unpack('<4I', key)
    b0, b1, b2, b3 = struct.unpack('<4I', block)

    b0 ^= k0
    b1 ^= k1
    b2 ^= k2
    b3 ^= k3

    for _ in range(16):
        b0 = (b0 + b1) & MASK32
        b1 = (b0 ^ rol32(b1, 5)) & MASK32
        b2 = (b3 + b2) & MASK32
        b3 = (b2 ^ rol32(b3, 8)) & MASK32
        b2 = (b1 + b2) & MASK32
        b0 = (rol32(b0, 0x10) + b3) & MASK32
        b3 = (b0 ^ rol32(b3, 0xd)) & MASK32
        b1 = (b2 ^ rol32(b1, 7)) & MASK32
        b2 = (rol32(b2, 0x10))

    return struct.pack('<4I', b0 ^ k0, b1 ^ k1, b2 ^ k2, b3 ^ k3)


def mw_fn_decrypt(key: bytes, counter: bytearray, data: bytearray) -> bytes:
    for offset in range(0, len(data), 16):
        stream = mw_fn_get_keystream(key, counter)
        for j in range(0, min(16, len(data) - offset)):
            data[offset+j] ^= stream[j]
        for i in range(15, -1, -1):
            counter[i] = (counter[i] + 1) & 0xFF
            if counter[i] != 0:
                break
We can look at the disassembly of the call to mw_fn_decrypt to identify the offsets of the input parameters in the struct:

What we identify:
- The (16 byte) key is at offset
0x4in the struct (just behind the struct size) - The (16 byte) counter is at offset
0x14in the struct (just behind the key) - The buffer is at offset
0x240in the struct
Remembering that the struct starts at offset 0x5 in the second-stage shellcode payload and has a size of 0x1B180, we can extract it as follows:
$ dd if=payload.bin bs=1 skip=5 count=$((0x1b180)) of=struct.bin
Then we can fetch the offsets. For the key we get:
$ xxd -s 4 -l 16 -g 1 -c 16 struct.bin | cut -d: -f 2 | cut -d' ' -f 1-17
b9 c8 42 4e 0e e2 dd 71 26 a0 05 5d 61 ae 00 ec
And for the counter:
$ xxd -s 0x14 -l 16 -g 1 -c 16 samples/struct.bin | cut -d: -f 2 | cut -d' ' -f 1-17
b6 88 d0 de b9 07 30 45 e9 7a 24 53 3d a9 ad bd
By calling into our decyption logic implemented in python, we can decrypt the offset in the struct using the following code snippet:
import sys

blob_path = sys.argv[1]
with open(blob_path, 'rb') as f:
    blob = f.read()

    size = int.from_bytes(blob[0:4], 'little')
    if size != len(blob):
        raise ValueError('Blob size the not match the size at offset 0')
    key = bytes(blob[4:4+16])
    counter = bytearray(blob[20:20+16])
    decrypt_size = size - 0x240
    buffer = bytearray(blob[0x240:0x240+decrypt_size])

    mw_fn_decrypt(key, counter, buffer)

    with open('payload.bin.0x240.dec', 'wb') as out:
        out.write(buffer)
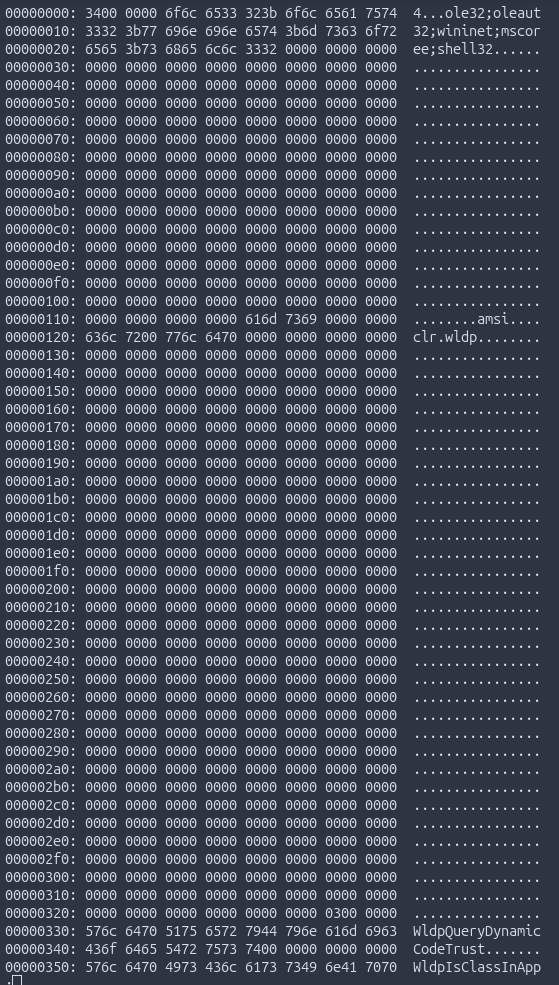
Looking at the output in the hexdump, we see that it does look like the result of a successful decryption:
Even more interesting, at offset 0xc08 in the decrypted buffer (i.e. 0x240 + 0xc08 = 0xe48) in the struct, we see an MZ header followed by a DOS stub, indicating a third-stage payload:
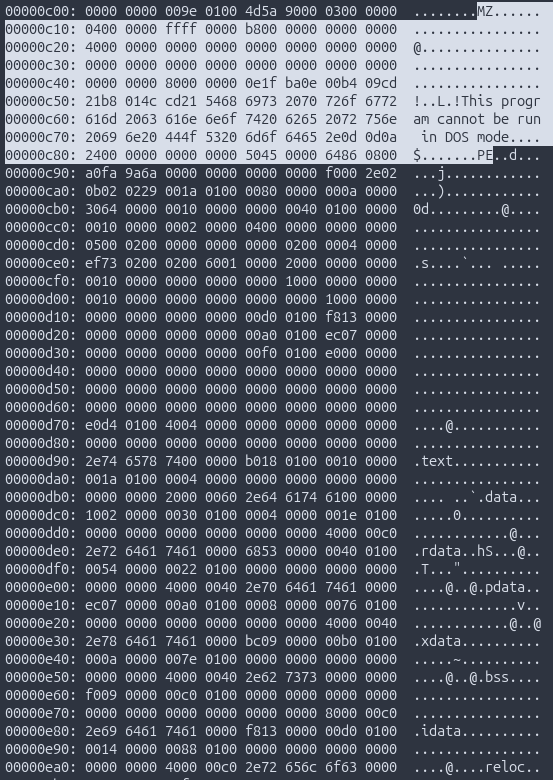
We can try to extract the payload as follows:
dd if=payload.bin.0x240.dec bs=1 skip=$((0xc08)) of=stage3.exe
The file command confirms that it is a 64-bit executable:
$ file stage3.exe
stage3.exe: PE32+ executable for MS Windows 5.02 (GUI), x86-64 (stripped to external PDB), 8 sections
Let us note the hash for later usage:
$ md5sum stage3.exe
282e429c361b851ddd32d1e1135c268e  stage3.exe
In the next step, the code extracts data from the struct and computes its maru hash.
This computed hash is compared against a target value that is also extracted from the struct.
Looking at the offsets in the struct in the disassembly:

we can see that they correspond to:
- address of hash input data:
0x7f0 - address of target hash:
0x8f0
Taking into consideration that the encrypted blob in the struct starts at offset 0x240, we expect to find the corresponding values in the decrypted blob at:
- address of hash input data:
0x5b0 - address of target hash:
0x6b0
The hexdump shows indeed some values at these offsets:
$ xxd -s $((0x5b0)) -l 264 payload.bin.0x240.dec
000005b0: 7178 7170 7565 7561 0000 0000 0000 0000  qxqpueua........
000005c0: 0000 0000 0000 0000 0000 0000 0000 0000  ................
000005d0: 0000 0000 0000 0000 0000 0000 0000 0000  ................
000005e0: 0000 0000 0000 0000 0000 0000 0000 0000  ................
000005f0: 0000 0000 0000 0000 0000 0000 0000 0000  ................
00000600: 0000 0000 0000 0000 0000 0000 0000 0000  ................
00000610: 0000 0000 0000 0000 0000 0000 0000 0000  ................
00000620: 0000 0000 0000 0000 0000 0000 0000 0000  ................
00000630: 0000 0000 0000 0000 0000 0000 0000 0000  ................
00000640: 0000 0000 0000 0000 0000 0000 0000 0000  ................
00000650: 0000 0000 0000 0000 0000 0000 0000 0000  ................
00000660: 0000 0000 0000 0000 0000 0000 0000 0000  ................
00000670: 0000 0000 0000 0000 0000 0000 0000 0000  ................
00000680: 0000 0000 0000 0000 0000 0000 0000 0000  ................
00000690: 0000 0000 0000 0000 0000 0000 0000 0000  ................
000006a0: 0000 0000 0000 0000 0000 0000 0000 0000  ................
000006b0: 279f 2493 5ec2 529f                      '.$.^.R.
The output of the following python script (making use of our implemented hashing functions):
seed = 0xCA8EB32D0E94CAB4
data = bytes.fromhex("7178717075657561")
print(f"{hex(mw_fn_str_hash(data, seed))}")
returns the value 0x9f52c25e93249f27 which corresponds to the little-endian representation of the 64-bit integer at offset 0x6b0 in the decrypted blob.
Evasion
After the decryption and the validation of the blob, the code fetches constants and flags from the decrypted blob.
Based on these constants, different paths in the code are taken, so they are likely configuration flags:
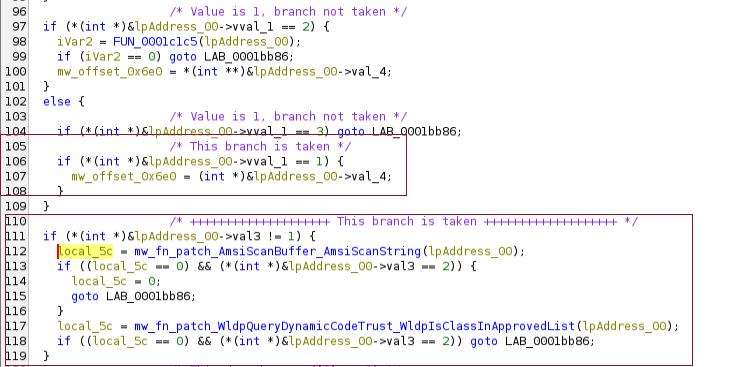
We can read the constants from the decrypted buffer and follow along. In our case, the following two functions are called:
mw_fn_patch_AmsiScanBuffer_AmsiScanStringmw_fn_patch_WldpQueryDynamicCodeTrust_WldpIsClassInApprovedList
We will take a look at the latter one, the principle of the former is the same:
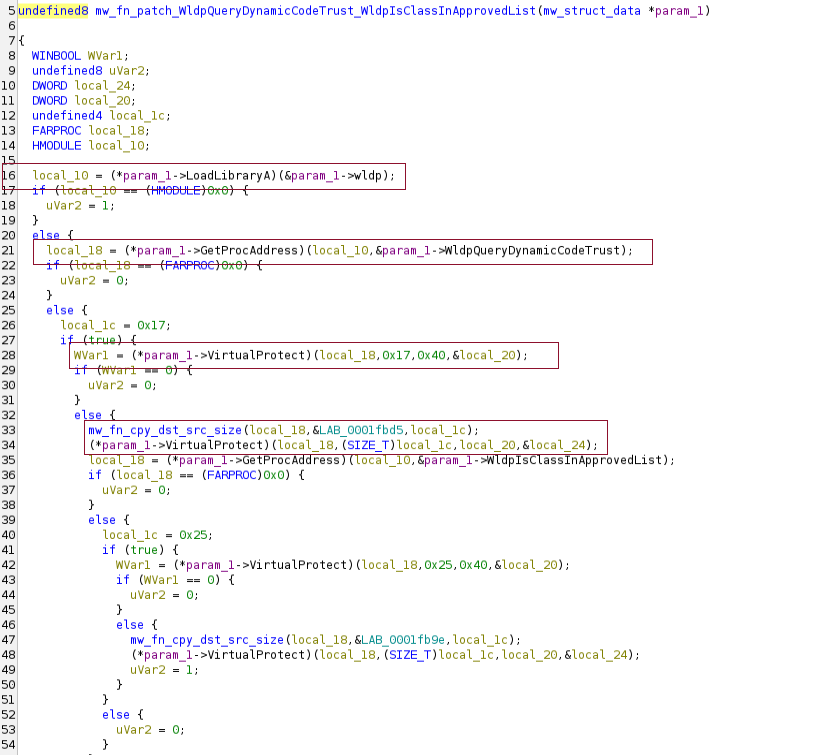
The function loads the amsi module by name through a call to the LoadLibraryA API.
Then GetProcAddress is used to resolve WldpQueryDynamicCodeTrust and VirtualProtect is used to change the permission of the first 0x17 bytes of the function to PAGE_EXECUTE_READWRITE (0x40).
Then the content of LAB_0001fbd5 is copied to the beginning of the function and the original permissions are restored through another call to VirtualProtect.
The bytes copied to the function correctly read the parameters but simply make the function return zero without any action, thereby disabling it:
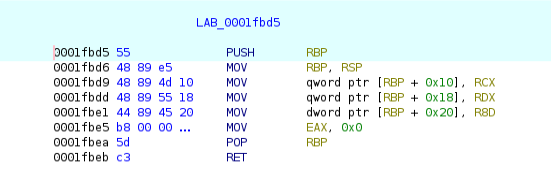
After that, the same procedure is repeated for WldpIsClassInApprovedList.
Notice that this is the second time such in-memory patching is performed.
We previously saw it in the loader already.
Reflective Loader
In the next step, a function call to a reflective loader is performed:

The function is large and we will not go into all details:
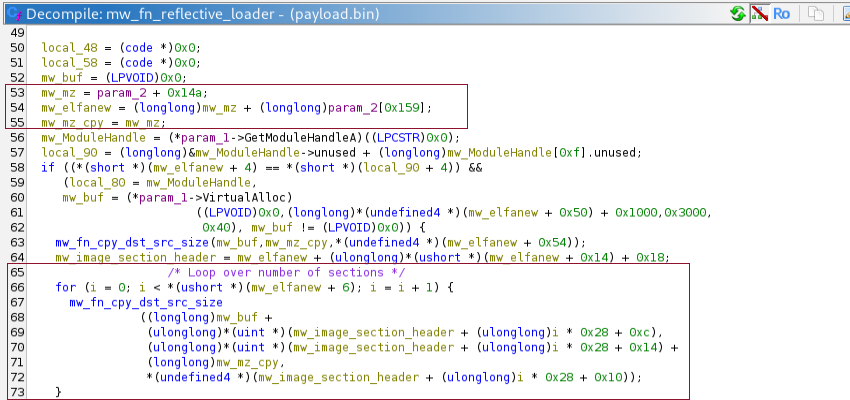
The most important part is at the beginning. By looking at the first parameter and the disassembly to identify the offsets we see that the address of the MZ header in the decrypted buffer is referenced.
This is a strong hint that something is done with the decrypted executable.
Then, a buffer is allocated and the sections are mapped into this buffer.
Further below, the address of the entry point of the executable is stored in a variable:

At the end of the function, this address is passed to the CreateThread API.
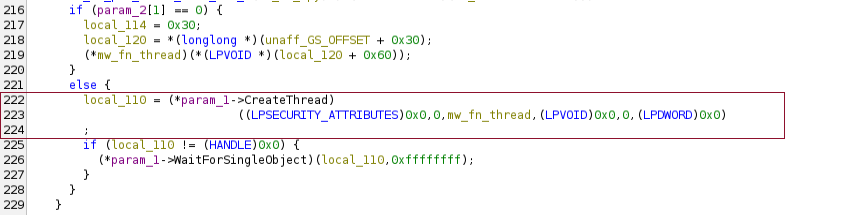
While no complete analysis has been performed, this strongly indicates that the decryted executable is reflectively mapped into memory and executed.
Outlook
In the third part, the executable that we dumped will be analysed.